Thursday, July 29, 2010

Miya and Elisabeth will style your life.

Who are Miya and Elisabeth? Why, they're those lovely ladies you see right up at the top of this post, and they are simply fabulous. I've blogged about my friend Miya's incredible talents before - she is a true artist, and a designer extraordinaire. (She created my header, with which I am in deep, deep love.) Her newest venture is a joint effort with her equally talented friend Elisabeth, and is called You + ME*. (The "you" being, well, you, and the ME being Miya and Elisabeth.)

These two are life stylists. They will help you find the perfect gift, plan the perfect moment, or design the perfect party. Whatever your heart desires. Their goal is to make your life as pretty as a picture, something at which they excel pretty damn hard. Need proof? First, let me tell you this: Miya's wedding was one of the most beautiful, original, thoughtful events I've ever attended. Everything about it was pitch-perfect without being twee, and I've rarely seen a group of guests enjoy themselves the way they did that night. And don't get me started on the super awesomeness of that photo booth (again, see above) and those flowers.

Need more proof? Head on over to their new website, and make sure to check out their inspiring blog, full of cool gift, shopping and cooking ideas. I don't know about you, but I'm ready for some lemon-blueberry pancakes. Like, right now.

Tuesday, July 27, 2010

60th and 1st, 25 July, 2:00 PM.

Is anyone else addicted to Hipstamatic? Because I am.

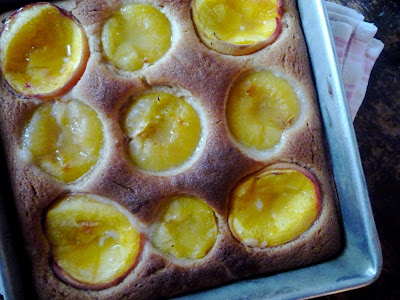
Apparently, I'm all about the peaches.

Summer's bounty is everywhere these days. On trips to the market, I'm typically overwhelmed by the options on hand: berries, tomatoes, corn, melon, greens, stone fruit...they all abound, and, more often than not, temptation overwhelms my reason. I wind up with three pounds of peaches, or two pounds of plums, and I'm left - all alone - in my apartment, trying to figure out what to do with all of it before it goes bad on me.

This weekend, I decided to make a cake. As I often do when I am in need of inspiration, I headed over to Smitten Kitchen and did a little poking around. I searched for plum recipes, peach recipes, general stone fruit recipes...and hit the jackpot. I wanted something tasty that would showcase the peaches and plums I'd bought, but also be easy to get into the office the next morning. (I made a blueberry-nectarine buckle last week that nearly did me in on the subway.) Deb's dimpled plum cake seemed the perfect solution.

I didn't have enough peaches to make a lemon-and-peach version, so I went half and half: lemon with peaches and green plums. I was also out of light brown sugar, so I used dark - and loved the results. The cake was moist, with a fine crumb, and fragrant with lemon and molasses. And, true to expectations, it was remarkably easy to make and to transport - and, given that it was more or less gone by 1 PM, I'd say it was a hit at the office, too.

What more could a girl ask for out of some Sunday afternoon interwebs poking-about?

Dimply Peach and Plum Cake

Adapted from Smitten Kitchen

1 1/2 cups flour
2 tsp. baking powder
1/4 tsp. salt
Scant 1/4 teaspoon ground cinnamon
5 tbs. unsalted butter, at room temperature
3/4 cup (packed) dark brown sugar
2 eggs
1/3 cup canola oil
Grated zest of 1 lemon
1 1/2 teaspoons pure vanilla extract
Two peaches and three plums, halved and pitted

Place a rack in the center of your oven and pre-heat to 350 degrees Fahrenheit. Butter and flour an eight-inch square baking pan, and place on a cookie sheet. Set aside.

Stir together the flour, baking powder, salt and cinnamon in a small bowl.

In the bowl of a stand mixer fitted with the paddle attachment (or using a hand mixer fitted with the beaters), beat the butter on medium speed until it is light and creamy, about three minutes. Add the sugar and continue to beat on medium speed, about three minutes more, until the mixture is light, fluffy and uniform. Add the eggs one at a time, beating well to incorporate fully after each addition.

Beat in the oil, zest and vanilla, then reduce the speed to low and add the dry ingredients in two or three batches. Using a spatula, give the bowl a good swipe around the edges to make sure the batter is uniform. Pour into the prepared pan.

Arrange the plums and peaches prettily, cut-side up, in the batter. Jiggle them a bit to make sure their tops are even with the top of the batter.

Bake for 30-40 minutes, checking every five minutes past twenty to see how you're doing. When a knife or tester inserted into the middle of the cake comes out clean, you're done.

Set the cake on a rack to cool for at least fifteen minutes. (This will also give the fruit juice that's come out of the plums and peaches to seep into the cake.) When you're ready to serve the cake, run a knife around the edge and invert it onto a plate, then back onto a final plate. (In other words, serve fruit-side up.)

Serves 8.

Monday, July 26, 2010

Perfect pancakes...and peaches.

A couple of years ago, during my annual visit to Nick and Louisa, we ate the most delicious pancakes I have ever tasted. They come to us - unsurprisingly - courtesy of the amazing Ruth Reichl, who added her own personal pancake recipe to the Gourmet cookbook. Their marvelous texture and flavor come mainly from an exorbitant amount of butter in the batter and from being cooked as pancakes should be: gently, in just enough fat, over a moderate flame.

In fact, no matter the recipe, those are the basic principles to making a quality pancake. Too many of us let the skillet get too hot, or fail to wipe it down between batches. Doing so results, respectively, in burned outsides and raw insides, as well as a smoky, gritty mess of a pan. By following a few simple steps, we can all avoid the dreaded "first pancake" syndrome, and turn out perfect specimen after perfect specimen.

First of all: use enough oil, but not too much. If you are using a non-stick skillet, you want only the thinnest film of oil, about half a teaspoon per batch for a large (8 to 12 inch) skillet. For a standard skillet, use just a bit more; you should be able to swirl the oil around a bit - but just a bit.

Keep the heat moderate; when you drop your batter into the pan, it should hiss slightly and not stick, but it should brown slowly to a golden hue, not quickly to dark brown or black. Just keep an eye on it; if the edges of your pancakes bubble rapidly immediately, the pan is too hot. Don't be precious about adjusting the heat as you go; the pan will change in temperature as you add or remove pancakes to it. You must compensate by adjusting the flame.

Wipe out the pan between batches, and add fresh oil. If things have gotten really sticky and icky, use a bit of water to get the brown bits up from the bottom before wiping with a paper towel.

Finally, pay attention! Pancakes are not something you can walk away from. Watch how they bubble, how they firm up around the edges; they will not cook on a perfect schedule, so you must pay attention to them and flip them according to their own time.

Now that you know how to make pancakes in general, why not try these in particular? I've taken Ruth's superlative version and riffed on it a bit; the butter has been browned, and I've added chopped fresh peaches to the mix, in a nod to a) the season, and b) the fact that I didn't have any blueberries in the house this morning.

I hope you enjoy them!

Browned Butter Pancakes
Adapted from the Gourmet Cookbook

1 cup buttermilk (plain old milk will work, too)
2 eggs
3 tbs. canola oil
8 tbs. (1 stick) unsalted butter
1 cup flour
4 tsp. granulated sugar
4 tsp. baking powder
1 tsp. salt
3-4 ripe peaches, peeled, pitted and cut into 1/2-inch cubes
Additional canola oil, for cooking

In a small skillet or saucepan set over medium heat, melt the butter. Continue to cook just until the butter turns slightly brown and smells nutty. Set aside until cool.

In a small bowl, whisk together the buttermilk, eggs and oil, then whisk in the cooled, browned butter. In a medium bowl, stir together the flour, sugar, backing powder and salt. Stir in the milk mixture until just combined.

Heat 1/2 teaspoon or so of oil in a large skillet over moderate heat until hot but not smoking. Working in batches of two, pour 1/2-cup measures of batter into skillet. Drop five or six peach cubes into each pancake and cook until bubbles have formed on top and broken, about two minutes.

Flip pancakes with a spatula and cook until undersides are golden, about a minute or two longer. Remove from the pan to a warmed plate. Wipe out the skillet between batches, adding oil for the next batch to the clean skillet. Continue until all the batter has been turned into pancakes!

Makes about eight pancakes.

Saturday, July 24, 2010

Queenie's Treasury

Happy weekend, guys! It's yet another sweltering day here in New York (95 and super-humid, yay!), and I've taken refuge from the sun in my apartment. Before I get down to figuring out what to do with the pound each of plums and peaches I bought this morning, it's time for an edition of the Treasury!

First up this week, an intriguing, slightly haunting story from the New York Times. Rokeby was built by the Astor family in the 19th century, and now, despite its crumbling state, it plays home to a motley crew of Astor and Livingston descendants, most of them artists. The piece is a captivating portrait of the decay of the American aristocracy; at Rokeby, an oval skylight installed by Stanford White co-exists with peeling paint and a lack of adequate heating. The photos have an eerie beauty, and I kind of want to poke around the place on my own.

J. Kenji Lopez-Alt has done it again. The MIT grad's Food Lab series for Serious Eats is one of the most awesome things on the interwebs, and his latest installation - instructions for making an In-N-Out Double-Double, Animal-Style - is the bomb. For those of us who live out here on the East Coast (read: sans In-N-Out), the ability to make a replica of the original right in a home kitchen is a pretty brilliant thing.

If you follow the interior design blogosphere at all, you've probably heard the news: Brides.com is now playing host to the Domino archives. Stories are being added slowly but surely, which is super-exciting, especially for those of us who don't have back issues on hand at home. One my favorite Domino stories of all time featured the design of editor Tori Mellott's 450 square foot apartment. Small space decorating is near and dear to my heart, and Tori's place is downright inspiring. I especially love her kitchen. That toile wallpaper and those kelly-green cabinets make me so, so happy.

Friday, July 23, 2010

Oh. Em. Gee.

The march of the peaches continues, my friends, and I couldn't be happier about it. Last week, I spotted a recipe for peaches poached in wine and basil over at Food52 and instantly intrigued. I've always been more of a baker than a poacher, but something about the simplicity of the recipe (wine, basil, sugar, water, peaches) called to me.

The fact that I'd bought two pounds of peaches to no particular end might also have had something to do with it.

Regardless of motivation, the fact remains that I decided to make the poached peaches on Sunday afternoon. I tweaked the recipe in the smallest way (using rosé instead of white wine, since it's what I had on hand), but the results were still heavenly.

After only a few minutes of poaching (and a very easy peel), the peaches were even more luscious and heady than they'd been in their raw form. The syrup heightened their sweetness, and the slow poaching process coaxed the peaches from delightfully ripe to lusciously, sensually soft. The rosé wine lent itself to a rosier syrup than I'd expected, delicately scented with basil. Its remainders will, no doubt, make for amazing cocktails.

Guys, I gotta tell you: this is pretty much the sexiest dessert ever. For reals.

Enjoy. (Insert lascivious wink here.)

Peaches Poached in Wine and Basil
Adapted from TheRunawaySpoon on Food52

1 cup (dry) rosé wine
1 1/2 cups water
1 1/2 cups granulated sugar
1 large bunch basil (about two cups' worth of leaves)
6 ripe yellow peaches

Place the wine, water and sugar into a wide-bottomed saucepan and stir to dissolve the sugar a bit. Bring to a boil over medium heat, and continue to boil for five minutes. Turn the heat down and allow the syrup to simmer gently while you halve the peaches.

Cut the peaches in half and gently remove the pits. This can be a delicate undertaking, depending on how ripe the peaches are. Add half the basil leaves to the syrup, then place the peaches in the pan, cut side down. (If all of your peaches don't fit in one go, you can do multiple rounds.)

Poach the peaches cut side down for about three minutes, then turn them (I used my fish spatula) over and poach for an additional three or four minutes. When pricked with a knife, the peaches should give way easily.

Using a slotted spoon, remove the peaches to a plate. Add any peach juices from the cutting board to the pan, along with the remaining basil. Bring the syrup to a boil and cook until reduced by half. Pour in any juices that have collected from the peaches, and let cool to room temperature.

Serve the peaches drizzled with the syrup; whipped cream or vanilla ice cream would also be lovely. Reserve most of the syrup for use in cocktails. Trust me.

Serves six.

Tuesday, July 20, 2010

Easy as tart.

I think I might have mentioned how much I love blueberries. And how much I love peaches. What, therefore, could be better than a recipe that combines the two into one delicious whole? Not a whole lot.

I'm a big fan of peach-blueberry pie, made with mountains of peaches and a very few berries, but I wasn't thinking far enough ahead to such a creation when I did my marketing last Saturday. The result? A pint of gorgeous, plump blueberries, and two small peaches left over from half a week of snacking on their companions.

The solution? A recipe for a smallish, easy-to-make tart that emphasizes the berries, treats the peaches as a luscious garnish and generally busts any myth claiming that pastry is tricky to prepare. You can use your food processor to make the dough, which you then press into the pan. No rolling means no flour-strewn counters. This recipe is a one-paper-towel-clean-up kind of deal, friends.

Hope you like it!

Simple Blueberry-Peach Tart

For the crust:
1 1/4 cups flour
1/4 cup sugar
1/4 tsp. salt
1 stick (1/4 lb.) very cold butter (cut into bits)
1 egg yolk

For the filling:
1 pint blueberries
Juice of half a lemon
Scant teaspoon of cinnamon
2 tbs. turbinado sugar, divided
1/8 tsp. salt
2 peaches, sliced
1 tbs. milk or cream

Lightly whipped cream, for serving

Place the flour, sugar, salt and butter in the bowl of a food processor fitted with the blade attachment. Pulse until the mixture resembles a coarse meal. Add the yolk and pulse a few more times, until the mixture becomes to come together.

Dump the dough into the middle of a tart pan (I use my eight by ten inch rectangular tart pan; you can also use a nine or ten inch circular pan.). Using your hands or the flat bottom of a measuring cup, press the dough evenly into the bottom. Press the dough up the sides to the rim of the pan and set the tart pan on a baking sheet. Refrigerate the dough-lined pan for 30 minutes.

Place a rack in the center of the oven and pre-heat it to 375 degrees Fahrenheit. Meanwhile, mix the blueberries, lemon juice, cinnamon and one tablespoon plus one teaspoon of the sugar together in a medium bowl. Allow to sit while the oven pre-heats. Once the oven is ready, remove the tart shell from the fridge and pour the blueberry filling into it, distributing evenly.

Place the peach slices on top of the berries, arranging them evenly over the top of the tart. Sprinkle the entire tart with the remaining sugar and lightly brush the exposed crust with the cream. Place the tart in the oven and bake until the berries are bubbling and the crust is golden, about 25-35 minutes depending on your oven's personality.

Cool on a rack until nearly cool before serving. You can also cool the tart completely, cover it well with plastic wrap, and serve it the next day. (Note: if you are in an area with a lot of humidity, the crust may soften a bit overnight. It's still tasty, though!) Serve topped with whipped cream.

Serves six.

Monday, July 19, 2010

Not too cool for school.

One of the coolest things I'm doing this summer is going to school. That's right, I'm back on the books! The School of Visual Arts recently created an MFA program for Interaction Design, and I'm taking one of their Summer Intensive courses. So far, it's been a great experience. I'm working on a group project and seriously enjoying the assigned reading.

Our first individual assignment was to write a short essay about one of our design heroes. None of you, I'm sure, will be surprised to learn that I chose one Mrs. Julia Child. I thought I'd share my little essay with you, since I know you love her as much as I do - or, if you don't, you soon will!

Julia Child is widely credited with revolutionizing the way mid-20th century Americans cooked and ate - and rightly so. But while we typically think of Julia's influence flowing primarily from her television shows - The French Chef in particular - it was her innovative way of writing a recipe, more than anything else, that led to her enormous influence on American home cooking and cuisine.

Traditionally, a recipe is written as a list of ingredients followed by a set of instructions in paragraph form. Julia, however, knew that when presented with recipes in this format, people tend to forgo reading through the recipe ahead of time, instead assembling the ingredients and diving in head-first. This method - cooking a recipe cold, without reading through the steps required - can often lead to confusion, mishaps and a frantic search for necessary equipment.

In Mastering the Art of French Cooking, Julia and her co-authors addressed this issue by listing ingredients and equipment alongside the relevant steps in the recipe instructions, instead of ahead of them. The result? Cooks were forced to read through the entire process ahead of time, ensuring a firmer grasp on the principles of the recipe and a far sunnier outcome.

Add in the book's incredibly helpful, beautiful line drawings that assisted readers in the trimming of artichokes and trussing of chickens, and it becomes clear that Julia Child's Mastering the Art of French Cooking is a masterpiece of design as well as of cuisine.

Dispatch from the field: Union Square Greenmarket.

July is a time of exceptional beauty at the Greenmarket. Tomatoes are finally out in full force, and bell peppers are popping up, too. Raspberries, blueberries and blackberries are parading through the stands.

Did I mention the peppers? These little Hungarian guys were all over the place last weekend, just begging to be mixed into a stir fry or chopped into a salad.

And stone fruit! Tiny, perfect, sweet-tart plums were everywhere, as were nectarines and peaches. Large, purple-skinned plums can't be far behind.

Tomatoes again, but I couldn't leave you without a last shot of the colorful goodness.

Saturday, July 17, 2010

Failsafe.

If there's one hors d'ouevre that never goes out of style, it has to be the crudité plate. A platter of fresh, seasonal vegetables accompanied by a delicious dip is pretty much always a crowd-pleaser, at least in my circles. In fact, I could make a whole meal of crudités, given ample opportunity and time.

The key to a great crudité platter is twofold: keep the veggies interesting, seasonal and colorful, and keep the dip interesting and fresh. Packaged dips or bottled dressings simply won't do here, and since making a delicious fresh version takes about ten minutes, why would you bother with the overpriced, over-processed variety? As far as veggies go, get creative. This time, I let the Greenmarket be my guide, and wound up with zucchini, cucumbers, carrots, radishes and grape tomatoes. A few weeks ago, it might have been fennel, radishes and snap peas.

I've spent years searching for the perfect dip, and I think I've finally found it. The recipe has been right under my nose all this time, lurking in my well-loved (but apparently not well-enough-thumbed) copy of The New Basics Cookbook. It's a twist on the classic Green Goddess dressing from the 1970s, here re-invented as a slightly chunky, herb-filled dip. I've made a few changes (subbing in yogurt for sour cream; using anchovy paste in the place of minced filets), but it's pretty true to the original, and will no doubt make your guests ask for the recipe. (It's happened to me each time I've served it, and I love it!)

Go forth and appetize, my friends.

Green Goddess Dip
Adapted from The New Basics Cookbook

3/4 cup mayonnaise
3/4 cup plain yogurt
1/4 cup fresh lemon juice (about one lemon's worth)
2 tsp. anchovy paste (or 4 anchovy filets, finely minced)
1/4 cup finely chopped flat-leaft parsley
1 clove garlic, finely minced
2 tbs. thinly sliced scallions
2 tbs. finely chopped chives
2 tbs. finely chopped tarragon leaves
Kosher salt and freshly ground black pepper

Combine the mayonnaise, yogurt, lemon juice and anchovy paste in a medium bowl, and mix well. Stir in the remaining ingredients and taste the dip. Adjust the seasoning to your liking.

Cover the bowl with plastic wrap and refrigerate the dip for at least 3 hours to allow the flavors to blend.

Makes 2 cups of dip, enough for about 8-10 people.

Thursday, July 15, 2010

This is the life.

I love my job. I like my life. And, most days, I'm pretty darn content with the demands they place on me. But, every once in a while, I sneak a glance over at the other side. What might it be like to be feckless and free, to be one of the ladies who lunch? One recent afternoon, I caught a whiff of luxury, and I liked it.

Lunch at Brasserie Ruhlman, Laurent Torondel's vast indoor/outdoor restaurant in Rockefeller Center, is most definitely a luxury. Menu highlights include steak frites, a lobster roll, oysters and sole meunière. Starting with shrimp cocktail, therefore, does seem the thing to do. What's more classic, or more perfect for a warm summer afternoon?

And I know you know that a true lady who lunches always orders steak tartar. After all, what good is a meal if it doesn't need to be mixed tableside? (Actually, this is the place to tell you that the service at Brasserie Ruhlman was a bit odd. Our waiter didn't seem to care for us much, and instead of offering to mix up my tartar himself, he said, "Would you like to stir?" and kind of walked away. Lame.)

And this is excellent steak tartar. The meat was fresh as could be, and the sauce and, er, fixins were wonderful: big, juicy, salty capers, chopped shallots, dill and parsley, all topped with a piquant dressing and a teeny, perfect quail egg. Yum.

The fries were pretty freaking awesome, too. If not terribly ladylike. Whatever.

Brasserie Ruhlmann
45 Rockefeller Plaza
212.974.2020

Wednesday, July 14, 2010

Le quatorze juillet.

It's that time again, folks! Time for feasting, fireworks and patriotism.

No, no - this isn't a late Fourth of July post. This is a FourTEENTH of July post. Today is Bastille Day, the day when France celebrates the storming of the Bastille prison (a turning point in the French Revolution) and their république in general. Here in the States, it's a fabulous excuse to celebrate French culture, wine and food.

I plan to mark the occasion with a glass of champagne and a crêpe of some kind. Or maybe some mussels. Ooooh, or steak frites. Hmmmm...

How will you celebrate? Whatever French tradition, drink or meal you choose, get things started off right with a little Marseillaise action. That's right, kiddos. It's time for your annual Casablanca clip. Enjoy.

Monday, July 12, 2010

On a roll.

I've lived on the Upper East Side of Manhattan for about seven years now. That's meant enduring seven years of raised eyebrows, "Oh, I'm so sorrys," and "But where do you eats?" Truth is, I moved to the neighborhood for the cheap rent, and stayed for the convenient commute. But, finally, my years of patient waiting (broken only by marvelous dinners at the now-shuttered Bar États-Unis and the slightly-too-dear-for-everyday Spigolo) seem to be paying off. The Upper East Side is creeping ever so slowly toward becoming cool.

No, really.

A few new places with cred have opened recently (not to mention the Shake Shack due to start slinging burgers by the end of the month), including an uptown branch of the downtown seafood mecca, Luke's Lobster. Jeremy and I visited their original East Village shop back in March, and thoroughly enjoyed ourselves. The rolls are plain and simple: lobster, butter, salt, pepper and a touch of Hellmann's, served up on a butter-toasted hot dog bun.

Now that they're so close to home, I've gotten the chance to try the shrimp roll, which is similarly unadorned, and just as tasty. The shrimp are small and tender, and pop lusciously in the mouth. For me, the buttered roll is half the point of a seafood roll, and the shrimp's less aggressive flavor lets the roll shine even brighter - so that made me pretty happy.

Most exciting of all, Luke's uptown branch has installed a Fryolator and will soon be serving fried belly clams. (As early as today; the staff needs to conquer some eyelash-singeing hiccups first.)

This New Englander couldn't be more excited. Bring. It. On.

Luke's Lobster
242 E. 81st Street (Between 2nd and 3rd Avenues)
212.249.4241

Saturday, July 10, 2010

Queenie's Treasury

It's the weekend! Hallelujah! It's been a wild, wacky (and actually pretty wonderful) week chez Queenie, and I'm looking forward to a little bit of rest and relaxation over the next two days. Before I get down to the relaxation part, though, I need to bake a cake for this guy. And before that, I have some Treasury goodness to share with you. Here goes!

First up, a recipe for Planter's Punch from Serious Eats. Planter's Punch is a classic rum cocktail made with dark rum, simple syrup, lime juice and bitters. It's pretty much perfect for the kind of stiflingly hot weather we've been having in New York recently, and has some sentimental value for me, too. My grandparents used to have a house on a teeny little island in the Bahamas, and Planter's Punch was the cocktail my grandfather would have ready and waiting for guests upon their arrival. So, for my purposes, I shall re-christen the drink Pops' Punch - but you go ahead and call it whatever you like.

I love this room. I could live in this room. And, yes, I know - it's really, really pink. But still. I could live here. That ceiling! That table! That pendant! Love.

The Style Files brings you the prettiest lemonade ever. I don't plan to make any this weekend (see above, re: cake-baking), but I think you definitely should. Please send pictures, okay?

Planter's Punch photo courtesy of Art of Drink.

Thursday, July 8, 2010

Get thee a galette!

Berry season is in full swing here in New York, which means fresh blueberries are abundant. The berries are at the height of their goodness: they're firm and sweet and just a tad tart. And while berries from southern New England and the Midatlantic don't get the magnificently wild tang that graces berries from Maine, ours are still pretty darn good.

When faced with a pile of in-season fruit of any variety, my first instinct, typically, is to bake a tart. This time around, it's a blueberry galette, a free-form tart very similar to the strawberry-rhubarb crostata I made back in the beginning of June. Instead of individually sized tarts, here I've made one large dessert to serve a group of four or five, but it's just as easy to make as the crostata, and just as fun to eat.

I've seasoned the tart with my favorite combination for blueberries: sugar, vanilla and cinnamon, along with a dotting of butter and a hint of salt. The butter and vanilla lend the berries richness, while the cinnamon adds a spice to heighten their tart nature. Once you add all that, you will, of course, need a bit of sweetened whipped cream to cut through it.

Am I right?

Blueberry Galette


For the pastry:

1 1/4 cups flour
1/4 cup polenta
2 tsp. granluated sugar
1/4 tsp. salt
1 stick butter, very cold or frozen, cut into 1/2-inch bits
3 tbs. ice water

For the filling:
1 pint of blueberries, rinsed and dried
2 tbs. turbinado sugar
1/2 tsp. cinnamon
1/2 tsp. vanilla
1/8 tsp. salt
1 tbs. butter, cut into 1/4-inch bits

1 egg, beaten with a tablespoon of cold water
Sweetened whipped cream, for serving

Place the flour, polenta, sugar salt and butter in the bowl of a food processor fitted with the blade attachment. Pulse together until the mixture is mealy and most of the butter is about the size of small peas. With the processor running, stream the water in one teaspoon at a time until the mixture begins to come together in one or two big clumps. You may not need all the water, depending on the humidity in your ingredients and the air. (Alternately, you can make the pastry in a medium bowl, using a pastry blender. A food processor is super-fast, but a pastry blender works well, too. Make sure to chill the bowl ahead of time.)

Turn the dough out onto a lightly floured surface and mold into a large disc. Wrap in plastic wrap and place in the refrigerator. Let the dough rest for at least an hour; it can sit in the fridge for up to 36 hours before you use it.

When you're ready to make the filling and bake the galette, take the dough out of the fridge and let it sit; this will help take the chill off a bit. Pre-heat the oven to 375 degrees Fahrenheit. Place the blueberries in a medium bowl and add the sugar, cinnamon, vanilla and salt. Toss to combine evenly, and set aside while you roll out the pastry.

Lightly flour a piece of parchment paper and place the dough in its center. Flour your pin and use it to whack the disk of pastry once or twice, then start rolling it out from the middle outward, spinning it if you need to, until you have a roughly circular shape about 1/4 inch thick. Transfer the crust (on the parchment paper) to a cookie sheet.

Spoon the filling into the middle of the tart, leaving about two inches of crust as a border. Starting anywhere you'd like, fold the pastry up over the filling. Continue to fold in triangles as you go around the tart (Refer to the photo above; it's easy to do once you take a look at a finished version, I think.) until all the edges are folded over the filling, leaving a nice circle of pretty fruit exposed. Using a pastry brush, paint the crust with the beaten egg; this will give it a nice sheen. Dot the exposed filling with the butter.

Place the tart in the oven and bake for 25-35 minutes, depending on your oven, rotating the tart halfway through baking. Bake until golden-brown and bubbly; the crust may leak some juices, but should hold up pretty well in any case, despite the liquid. Once the tart is done, remove it from the oven and transfer it, on its parchment paper, to a cooling rack. Cool close to completely before slicing. Serve topped with whipped cream.

Serves four to five, generously.

Wednesday, July 7, 2010

New friends and noodles.

Last week, I met a new friend for dinner at Momofuku Noodle Bar. Jason is someone I've been tweeting with for more than a year now. He's been living in Boston, but moved to New York about a month ago - something I find very, very brave. He's living in Park Slope, but I insisted we have our first meal together at one of my favorite Manhattan spots.

It was a warm evening, and I ordered the ginger-scallion noodles, a tangle of hot ramen dressed in room-temperature ginger-scallion sauce and topped with pickled cucumbers and marinated mushrooms. I, of course, added several glugs of Sriracha and proceeded to attack the bowl. Yum.

To drink, Jason and I both went for the shoju slushies: limeade, this time. I had a small, but could have had about four large ones. But that might give my new friend the wrong impression. Gotta save the drunkenness for a little while, at least. Right?

Tuesday, July 6, 2010

Grill-tastic.

One of the best things about having an actual backyard is the ability to grill with abandon. I really, really miss grilling; it's been almost nine years since I had a grill at my disposal, and, believe me - I feel its absence.

So, of course, I was seriously psyched to get to eat a whole lot of grilled goodies during my trip to Ohio last month. Nick and Louisa are pretty amazing with the grill; Nick's ribs in particular are really. Effing. Good. On this trip, though, we tried to be a bit healthier, and went with slightly less naughty cuts and sauces. We grilled some gorgeous peppers and spring onions one night, to eat alongside...

...this. This is matambre (courtesy of The Gourmet Cookbook), a traditional Argentinian preparation for flank steak. You butterfly the flank steak and fill it with a mixture of breadcrumbs, garlic, parsley, spinach, bacon and carrots, held together with a bit of the rendered bacon fat. Rolling it and tying it for grilling is most definitely a two person job, but once it's ready to go, it's easy to finish.

And super-easy to eat. The meat was seriously flavorful after sitting only an hour or so full of filling; it would probably be even more impressive having sat around for a whole day - which you can totally do. An excellent option for making ahead of time.

Another night, we tried Gourmet's Foolproof Grilled Chicken. It's brined before it's grilled, and once it's cooked, you dip it in a spicy, Asian-inspired vinaigrette made with fish sauce and lime juice. It is, in a word, delicious.

And did I mention...smoky from the grill? Oh yes.

Monday, July 5, 2010

Summer in a bowl.

Corn is in season, folks! Corn started showing up at the Greenmarket during the last weekend of June, just in time for the Fourth. There's little that says "summer" to me quite as clearly a fresh ear of sweet yellow corn, so, of course, I had to snap some up to feed myself over the long holiday weekend. I nabbed five ears and decided to use the first to make one of my favorite treats: warm corn and tomato salad.

I've made endless variations of this salad over the years; my favorites always include garlic, chives and a healthy amount of salt and pepper. This time around, I added a handful of gorgeous scallions and topped the whole thing with a fried egg - the easiest way to turn a bowlful of veggies into a fully-rounded meal.

This salad is a celebration of early summer, one that can be enjoyed for breakfast, lunch or dinner - or all three, if that's how you roll.

Corn and Tomato Salad with a Fried Egg

2 tsp. olive oil, plus more for frying the egg
1 clove garlic, finely chopped
2 scallions, thinly sliced
1 ear of corn, sliced off the cob
1 medium tomato, cut into 1/2-inch pieces
2 tbs. chives, finely chopped
1 egg
Salt and freshly ground black pepper

Heat 2 tsp. of olive oil in a small (6-inch) skillet set over medium heat. Once hot, add the garlic and scallions and saute for a few minutes, until the garlic is fragrant and the scallions are softened.

Add the corn to the pan and saute for a minute or two, mixing the corn well with the aromatics. Add the tomato and season with salt and pepper. Cook for about a minute, stirring, and then add 2/3 of the chives to the pan. Cook for another minute or so, then remove the mixture to a shallow bowl.

Wipe out the skillet with a paper towel. Add enough olive oil to thoroughly coat the bottom of the pan and set it to warm over medium heat. Crack the egg into a ramekin. Once the pan is hot, add the egg slowly to the pan, doing your best to center the yolk in the white.

Fry the egg over medium heat for 3-5 minutes, depending on how done you like your eggs. Season lightly with salt and pepper, then remove from the pan with a slotted spatula (I like this one.) and add it to the top of the corn and tomato mixture.

Top the egg and salad with the remaining chives, season to taste with salt and pepper, and eat!

Serves one.

Sunday, July 4, 2010

Getting in the spirit, Greenmarket-style.

Even the Greenmarket was patriotic this weekend.

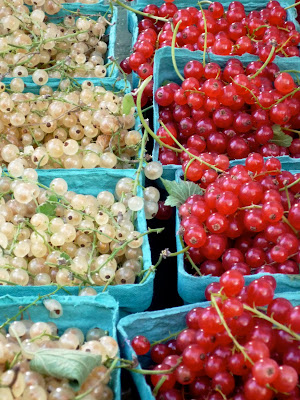
Between the blueberries, raspberries, sweet cherries and red and white currants, it was a veritable playground for those eager to bake a flag cake, cherry pie, or berry tart. (I'm among that last group there. Recipe for blueberry galette, coming up!

Independence: worth celebrating.

Happy Fourth of July, everyone! Independence Day in the States is generally considered to be a time of barbecues, fireworks and general merriment. (Lest we forget, though, here's the reason we're celebrating: our Declaration of Independence.) Me? I'll be spending the day making a blueberry tart, doing a little shopping, and seeing a French movie. I know, I know - sacrilegious!

It's not that I wouldn't love to be barbecuing in the open air, but this is New York, and that sort of thing is a bit harder to come by. Instead, we drink rosé at cafe tables, enjoy a delicious meal, and recall our status as one of the nation's original capital cities.

How are you celebrating the Fourth?

Saturday, July 3, 2010

Queenie's Treasury

Happy Fourth of July weekend, everyone! In a move I consider to be true to the holiday's culinary traditions, I've bought a pint of blueberries to use in a small tart tomorrow, and cannot wait for some seriously good fireworks. In the meantime, here are some Treasury picks to entertain you.First up this week, a fabulous spot for vintage goodies. Haven Vintage's Etsy shop is my latest favorite. I've been poking around for some vintage cocktail glasses for a bar cart (another recent obsession), and found a gorgeous set of gold, faux-cane old-fashioneds at Haven. They have a perfectly curated assortment of vintage and antique pieces, mostly small housewares. I can picture this yellow wire basket holding throw blankets in a bedroom corner, and the bar towels? They just make me happy!

Next, an interesting article from the New York Times about Connecticut's cutthroat world of farmers' market promotion and, well, marketing. The field is so flush with contenders in the state that markets have begun offering promotions and discounts to entice buyers to their booths. I wish this were a problem in some of the neighborhoods here in New York.

Last, a little something to make you smile - or, if you're like me, to make you laugh so hard that your coffee almost comes out your nose. Catalog Living is a new blog chronicling the ridiculousness that is housewares catalog styling. Random hats under the coffee table? Giant, impossible seashells? Useless, oversized abacuses? (Abaci?) Catalog Living has - and mocks - it all. I can't get enough.

Friday, July 2, 2010

Last gasp.

Strawberry season is drawing to a close.

I actually couldn't believe how plentiful the berries still were last Saturday, and I was glad for it. Late-season berries tend to be sweeter and gushier; they're basically sugar held loosely together by vitamin C and strawberry seeds.

You have to eat them the day you buy them, lest they turn into strawberry booze overnight, but that's okay. After all, how could you ever resist?

Maybe there will be some tomorrow, too. Mmmmm...

Thursday, July 1, 2010

Packaging lust.

When Louisa and I visited the farmers' market at Crocker Park, we also stopped in to Trader Joe's for some additional provisions.

We have a Trader Joe's in Manhattan these days, but I don't go there terribly often. It's down in Union Square, and I'm typically pretty Greenmarket-focused whenever I'm there.

As a result, I haven't had a lot of opportunity to admire Trader Joe's packaging up close and personal. I was seriously blown away by the boxes of pudding.

I don't really care for instant pudding (though I'm sure theirs is better than most), but the packaging? It's fabulous! It's retro-magical! It's a 50s party in your grocery cart!

Now that's what I call a vacation.

Gewurtztraminer.

Rosé.

Happiness.
Blog Widget by LinkWithin